
At NWA, we've been enjoying some Warhammer 40,000 Kill Team, with many former Games Workshop tragics coming out of the woodwork to give it a go. So far we've seen Necrons, Death Cult, Imperial Guard, Dark Eldar, Deathwatch, Tau and Death Guard in action, with a promise of Harlequins, Rogue Traders, Orks and Eldar to come. Naturally, I'm keen on building a terrain set for the game, especially one that fits in a single box for ease of transport.
A little while back, my old employer, Good Games Box Hill were clearing out space and I ended up with a box of Heroclix Tournament Prize Support, including two of these "Power Plants":

A little while back, my old employer, Good Games Box Hill were clearing out space and I ended up with a box of Heroclix Tournament Prize Support, including two of these "Power Plants":

Thanks to the constantly-expanding nature of Heroclix, these plants were essentially worthless now, but I held onto them because I liked the look and thought they may be useful down the track.
When I came to design my Kill Team board, I wanted something generic enough to use for other skirmish games, but still have enough of the 40k "feel" that my Deathwatch would look at home on the table. What I've ended up working on is a vague concept for a ruined alien tomb or temple that will look fine with Doctor Who or Guardians of the Galaxy running around when the Space Marines are away.
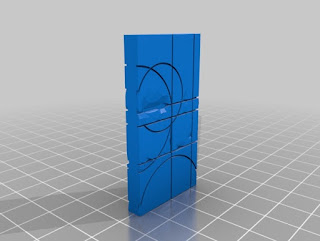
The gaps on the generators were a bit of a challenge, but once I hit on the idea of covering with some kind of panel, a quick trip to Thingyverse and the aid of a friend with a 3D Printer found me a solution;

There are ten different "Alien Monoliths", which were easily adapted to be around the right size, and the ten different designs suited the ten gaps on each pylon. The print quality wasn't as good as the image, of course, and the final results weren't perfect fits, but the imperfections work fine with my "ancient tomb/temple" idea anyway.

 The converted Ghoul Courtier gives a sense of scale.


Neither the hard plastic of the Power Plants, nor the 3D prints was too keen to take polystyrene cement, so each panel is held in place with supergule; the kind that comes in ten-packs for $2. The semi-circular gaps intended to accommodate the rings were filled with liquid nails, which doesn't stick brilliantly to glossy plastics, but also doesn't shrink when it dries, so the panels have something solid to support them. At this stage of a project, I like to get a coat of paint on so that I can see the "whole" piece, rather than a bunch of glued-together components. Some Grey Primer later and they were starting to look pretty decent.


When it comes to painting terrain, I've moved towards using standard spray cans to get down base colours; mostly because they're cheap and quick and I still don't have an airbrush. With some leftover silver, teal and 'almond' spray, I came up with this look;


So that I don't end up with a single, flat colour, I hold the can back around 40-50cm from the piece when spraying, essentially "dusting" the spray on. More passes means more colour. I like my terrain to be at least a little grubby, "lived-in" if you will, so I developed my own "Terrain Wash" to fast-track the weathering. The wash consists of a mixture of black and sepia watercolour paints with plenty of water and a dash of detergent to keep the suspension loose. Slop it on generously and leave to dry and you end up with something like this;

Depending on the local temperature/humidity, you'll probably need to let it dry overnight. As I've been buying mostly kit terrain recently, I've worked past my aversion to using miniature paints on larger pieces, so the details of the pylons were done with Games Workshop paints, specifically Hexwraith Flame and Nurgle's Rot. I've been using more and more of these "effects" paints recently, especially terrain, as it's a quick way to add both colour and texture to a piece and the final results are pretty neat.


The Hexwraith Flame adds an unearthly sheen to the panels, and the Nurgle's Rot implies something hideous is leaking out from underneath. What alien evil lurks inside? Who dares find out? I did attempt to paint the lines on the panels, but it only served to accentuate the poor quality of the prints. Besides, the pylons are terrain pieces, not miniatures, so some corner-cutting is forgivable. The final pieces look something like this:

Those are Primaris Marines, just to give an idea of size.
All in, these two pylons cost me essentially nothing and gave me two nice "feature" pieces for my Kill Team board, or objectives for other games. I've been complimented often on my terrain building skills, but here I wanted to show that something interesting and imposing on the table doesn't need to be expensive or complicated. Hope there's some inspiration there for some of you.
Comments
Post a Comment